Upgrading Oracle 10.2.0.1 to 11.1.0.6
Before Starting the steps for Oracle Database Upgrade, would like to give some clear picture on What is Oracle Database Upgrade?
Oracle Upgrade is a process of changing the environment of the database without modifying the existing data and configurations to avail a robust features in the latest version and releases of the Oracle product, that internally will delivers more automation, new features, and flexibility so that the data can be secure
Technically, Oracle Upgrade means changing the versions or the releases of the Oracle database within the same or in different servers or with different OS platforms (ex: version 9i to 10g, 10g to 11g, and also the release 10.1 to 10.2, 11.1 to 11.2) to the higher version/release that intern will upgrade the existing physical files state to the newer release/version
For upgrading, we will be using startup upgrade command. The startup migrate is deprecated from Oracle 10g for migration (Migration means moving the database from one OS platform to another, or from lower version/release to higher version/release as like upgrade, but the main difference here is we are logically extracting the physical files contents of data and we are loading it back to the higher version/release within the same or across the different OS servers, here the physical files state does not change as like upgrade)
For More understanding on Oracle Version number, Let say the oracle version # 11.2.0.1.0, Then 11 is major database release number, 2 is database maintenance release number, 0 is Application release number, 1 is component specific release number, 0 is platform specific release number.
If we upgrade the database, the first number and second number will change. The Fourth digit indicates the Patch number, This number will change whenever we apply patch to database.
Types of Upgrade:
The Pre-Upgrade Information Tool is a SQL script that ships with Oracle Database 11g and must be copied to and run from the environment of the database being upgraded. Complete the following steps to run the Pre-Upgrade Information Tool:
In 11g Home you installed, go to $ORACLE_HOME/rdbms/admin and copy the file utlu111i.sql to some temp location
[oracle]$cd $ORACLE_HOME
[oracle]$cd rdbms/admin
[oracle]$pwd
/u01/app/oracle/oracle/product/11.1.0/db_1/rdbms/admin
[oracle]$cp utlu111i.sql /tmp
The utility will give the output in the form of recommendation to be implemented before starting the upgrade. Unless these requirement are met, the upgrade will fail.
Login to the 10g Oracle database and run the above sql which is copied.
SQL> @/tmp/utlu111i.sql
Oracle Database 11.1 Pre-Upgrade Information Tool 02-11-2011 16:16:52
**********************************************************************
Database:
**********************************************************************
–> name: ORCL
–> version: 10.2.0.1.0
–> compatible: 10.2.0.1.0
–> blocksize: 8192
–> platform: Linux IA (32-bit)
–> timezone file: V2
.
**********************************************************************
Tablespaces: [make adjustments in the current environment]
**********************************************************************
–> SYSTEM tablespace is adequate for the upgrade.
…. minimum required size: 693 MB
…. AUTOEXTEND additional space required: 243 MB
–> UNDOTBS1 tablespace is adequate for the upgrade.
…. minimum required size: 262 MB
…. AUTOEXTEND additional space required: 62 MB
–> SYSAUX tablespace is adequate for the upgrade.
…. minimum required size: 438 MB
…. AUTOEXTEND additional space required: 178 MB
–> DEF_TEMP tablespace is adequate for the upgrade.
…. minimum required size: 61 MB
**********************************************************************
Update Parameters: [Update Oracle Database 11.1 init.ora or spfile]
**********************************************************************
– No update parameter changes are required.
.
**********************************************************************
Renamed Parameters: [Update Oracle Database 11.1 init.ora or spfile]
**********************************************************************
– No renamed parameters found. No changes are required.
.
**********************************************************************
Obsolete/Deprecated Parameters:[Update Oracle Database11.1 init.ora or spfile]
**********************************************************************
–> “background_dump_dest” replaced by “diagnostic_dest”
–> “user_dump_dest” replaced by “diagnostic_dest”
–> “core_dump_dest” replaced by “diagnostic_dest”
.
**********************************************************************
Components: [The following database components will be upgraded or installed]
**********************************************************************
–> Oracle Catalog Views [upgrade] VALID
–> Oracle Packages and Types [upgrade] VALID
–> JServer JAVA Virtual Machine [upgrade] VALID
–> Oracle XDK for Java [upgrade] VALID
–> Oracle Workspace Manager [upgrade] VALID
–> OLAP Analytic Workspace [upgrade] VALID
–> OLAP Catalog [upgrade] VALID
–> EM Repository [upgrade] VALID
–> Oracle Text [upgrade] VALID
–> Oracle XML Database [upgrade] VALID
–> Oracle Java Packages [upgrade] VALID
–> Oracle interMedia [upgrade] VALID
–> Spatial [upgrade] VALID
–> Data Mining [upgrade] VALID
–> Expression Filter [upgrade] VALID
–> Rule Manager [upgrade] VALID
–> Oracle OLAP API [upgrade] VALID
.
**********************************************************************
Miscellaneous Warnings
**********************************************************************
WARNING: –> Database is using an old timezone file version.
…. Patch the 10.2.0.1.0 database to timezone file version 4
…. BEFORE upgrading the database. Re-run utlu111i.sql after
…. patching the database to record the new timezone file version.
WARNING: –> Database contains stale optimizer statistics.
…. Refer to the 11g Upgrade Guide for instructions to update
…. statistics prior to upgrading the database.
…. Component Schemas with stale statistics:
…. SYS
…. OLAPSYS
…. SYSMAN
WARNING: –> Database contains schemas with objects dependent on network
packages.
…. Refer to the 11g Upgrade Guide for instructions to configure Network ACLs.
…. USER SYSMAN has dependent objects.
WARNING: –> EM Database Control Repository exists in the database.
…. Direct downgrade of EM Database Control is not supported. Refer to the
…. 11g Upgrade Guide for instructions to save the EM data prior to upgrade.
.
PL/SQL procedure successfully completed.
This scripts will generates to check whether all the properties will match during upgradings,
Tablespaces: Verifies that the tablespaces are suitable to upgrade, if any problems of space, increase the size of tablespaces
Update parameters: Check the update parameters from 10.2.0.1 to 11.1.0.6
Renamed Parameters: Check the renamed parameters in 11.1.0.6
Obsolete/Deprecated parameters: Remove the parameters which are deprecated in the 11.1.0.6
version. More about the deprecated parameters, refer the Oracle 11g documentation
Components: Verify all the components are VALID, if they show INVALID, run ‘utlrp.sql‘ from
Oracle10g’s ORACLE_HOME to make them VALID.
Miscellaneous Warnings: The timezone file version should be upgraded from 2 to 4.
The remaining miscellaneous warnings can be ignored.
Step 3: Executing the recommended steps
Following are the critical steps to be executed based on the above warnings. These command are to be executed while connecting to database from 10g Oracle home.
a) TimeZone Issue
WARNING: –> Database is using an old timezone file version.
…. Patch the 10.2.0.1.0 database to timezone file version 4
…. BEFORE upgrading the database. Re-run utlu111i.sql after
…. patching the database to record the new timezone file version.
Finding the version of existing timezone files
SQL> select * from v$timezone_file;
For 10.2.0.1, check the metalink note ID 413671.1. The table which defines the patch to be applied to upgrade the timezone.
If there is no official patchset for the version you are currently having then you can Identify patch for a different patchset, but with same release.
For example if you run 10.2.0.1 and there is no particular patch release. In this case we can make use of patch 5632264 for 10.2.0.2 and 10.2.0.3, and this will be applicable to 10.2.0.1 as well.
Please follow the metalink note ID 396387.1
Once you identify the correct patchset (5632264 for 10.2.X), download the same and unzip it.
1. Unzip the patch file p5632264_10203_Linux-x86-64.zip
$ unzip p5632264_10203_Linux-x86-64.zip
2. Change directory to the 5632264 and list, which will contain the timezone files
3. Backup the existing timezone files in the Oracle10g’s ORACLE_HOME, these will be present under
$ORACLE_HOME/oracore/zoneinfo directory
4. Copy the newly extracted files to the ORACLE_HOME path
$ cp -r 5632264/files/oracore/zoneinfo $ORACLE_HOME/oracore/zoneinfo
5. If the new timezone changes has to come to an effect, restart the database and select the timezone
SQL> select * from v$timezone_file;
FILENAME VERSION
———— ———-
timezlrg.dat 4
b) Optimizer Statistics Warning
WARNING: –> Database contains stale optimizer statistics.
…. Refer to the 11g Upgrade Guide for instructions to update
…. statistics prior to upgrading the database.
…. Component Schemas with stale statistics:
…. SYS
…. SYSMAN
Gather the dictionary statistics by executing the PL/SQL blocks
SQL> EXEC DBMS_STATS.GATHER_DICTIONARY_STATS;
PL/SQL procedure successfully completed.
SQL> EXEC DBMS_STATS.GATHER_SCHEMA_STATS(‘SYS’);
PL/SQL procedure successfully completed.
SQL> EXEC DBMS_STATS.GATHER_SCHEMA_STATS(‘OLAPSYS’);
PL/SQL procedure successfully completed.
SQL> EXEC DBMS_STATS.GATHER_SCHEMA_STATS(‘SYSMAN’);
PL/SQL procedure successfully completed.
Step 4: Rerun the Pre-Upgrade Utility
After executing the recommended steps, run the pre-upgrade utility once again to make sure, you don’t get any critical warnings.
Run the pre-upgrade utility script on 10g database while connecting from 10g oracle home. If every thing looks fine, Shut down the database from 10g Oracle Home
This time make sure you don't have the critical warnings like the one with TIMEZONE version.
Step 5: Backup the Oracle 10g Database
Perform the Oracle 10g database backup in any of the methods like cold backup, hot backup or RMAN backups. Backup the ORACLE_HOME software path too.
Cold backup : http://engistan.com/oracle-11g-cold-backup-with-restore/
Hot backup : http://www.oracledistilled.com/oracle-database/backup-and-recovery/user-managed-online-backups-hot-backup/
RMAN Backup : http://psoug.org/reference/rman_demos.html
Step 6: Create Parameter file for Oracle 11g
Backup the Oracle10g’s parameter file and paste under Oracle11g’s default path
$ cp /u01/app/o10g/product/10.2.0/db_1/dbs/initorcl.ora
/u01/app/o11g/product/11.1.0/db_1/dbs/initorcl.ora
Edit the Oracle 11g’s parameter file to remove the Obsolete/Deprecated parameters, as listed in the output of Pre-Upgrade Utility.
Step 7: Upgrade the database
1. If the Oracle10g database is still running, shutdown the database
2. Export the variables for Oracle 11g
$ export ORACLE_SID=orcl
$ export ORACLE_BASE=/u01/app/o11g
$ export ORACLE_HOME=/u01/app/o11g/product/11.1.0/db_1
$ export LD_LIBRARY_PATH=$ORACLE_HOME/lib:$LD_LIBRARY_PATH
$ export PATH=$ORACLE_HOME/bin:$PATH
3. Start the SQL*Plus with sysdba privilege
4. Start the Oracle11g database using the ‘startup upgrade‘
SQL> startup upgrade
5. Verify the version of Oracle
SQL> select * from v$version;
BANNER
———————————————————————-
Oracle Database 11g Enterprise Edition Release 11.1.0.6.0 – Production
PL/SQL Release 11.1.0.6.0 – Production
CORE 11.1.0.6.0 Production
TNS for Linux: Version 11.1.0.6.0 – Production
NLSRTL Version 11.1.0.6.0 – Production
6. Upgrade the data dictionary tables via the catupgrd.sql script.
SQL> @$ORACLE_HOME/rdbms/admin/catupgrd.sql
From hereafter the database downtime will starts and the upgrading a database will take its own time to completes depending upon the size of the database and environment.
Once the upgrades completes, the database will shutdown automatically
Step 8: Post Upgrading Steps
1. Once the upgrade completed, reinitialize the system parameters for normal startup and bounce back the database by login again as sys with sysdba privilege, and start the database to normal mode
SQL> startup
2. Check the dba_registry for the components and its status
SQL> select comp_name, status, version from dba_registry;
3. Run ‘utlu111s.sql‘ script to display the results of the upgrade
SQL> @$ORACLE_HOME/rdbms/admin/utlu111s.sql
4. Run ‘catuppst.sql‘ script from $ORACLE_HOME/rdbms/admin directory, to perform upgrade actions that change the database from UPGRADE mode to the NORMAL mode
SQL> @$ORACLE_HOME/rdbms/admin/catuppst.sql
5. Find for the invalid objects after the upgrade
SQL> select count(*) from dba_objects where status=’INVALID’;
COUNT(*)
———
1572
6. Run ‘$ORACLE_HOME/rdbms/admin/utlrp.sql‘ script to recompile the INVALID objects
SQL> @$ORACLE_HOME/rdbms/admin/utlrp.sql
7. Again find the status for invalid objects after recompiling them
SQL> select count(*) from dba_objects where status=’INVALID’;
COUNT(*)
———-
0
This will completes the manually upgrading the Oracle database from 10.2.0.1 to 11.1.0.6
Using the Database Upgrade Assistant (DBUA):
You can start the Database Upgrade Assistant (DBUA) via the shipped utility in Oracle 11g, the dbua command. The scripts we had executing in the Manually in the previous method will be executed and taken care by the DBUA utility
Follow the steps to upgrade the Oracle 10.2.0.1 database to 11.1.0.6:
1. Login in as Oracle 11g user, and initiate all the variables need for the environment
$ export ORACLE_BASE=/u01/app/o11g
$ export ORACLE_HOME=/u01/app/o11g/product/11.1.0/db_1
$ export LD_LIBRARY_PATH=$ORACLE_HOME/lib:$LD_LIBRARY_PATH
$ export PATH=$ORACLE_HOME/bin:$PATH
2. Confirm the Oracle 10g database name and ORACLE_HOME path is entered in /etc/oratab file
$ cat /etc/oratab
orcl:/u01/app/o10g/product/10.2.0/db_1:N
3. Execute the dbca utility from Oracle 11g’s path
$ $ORACLE_HOME/bin/dbua
4. A Welcome screen will appear, click Next

5. Select the database you want to upgrade from the list of available databases. You can upgrade only one database at a time. For all the list of databases, the database names should be listed in /etc/oratab file (Step 2). Click Next

6. The dbua utility will check the warnings should be taken care during the upgrading


12. If Oracle detects multiple Oracle Net listeners on the server, you will then be prompted to select a listener for your database, and the network configuration details will be displayed for your review and editing. Click Continue

13. A final summary screen displays your choices for the upgrade, and the upgrade starts when you
accept them. Click Finish

14. The DBUA will start upgrading the database, the upgrading logs can be read in the ORACLE_BASE path

15. The DBUA will complete the upgrading the database, Click ‘OK’

16. After the upgrade has completed, DBUA will display the Upgrade Results screen, showing the steps performed, the related log files, and the status.

17. The section of the screen titled Password Management allows you to manage the passwords and the locked/unlocked status of accounts in the upgraded database.

If you are not satisfied with the upgrade results, you can choose the Restore option. If you used DBUA to perform the backup, the restoration will be performed automatically; otherwise, you will need to perform the restoration manually.
When you exit DBUA after successfully upgrading the database, DBUA removes the old database’s
entry in the network listener configuration file, inserts an entry for the upgraded database, and reloads the file.
Following the upgrade, you should double-check the configuration and parameter files related to the
database, particularly if the instance name changed in the migration process. These files include
The tnsnames.ora file
The listener.ora file
Before Starting the steps for Oracle Database Upgrade, would like to give some clear picture on What is Oracle Database Upgrade?
Oracle Upgrade is a process of changing the environment of the database without modifying the existing data and configurations to avail a robust features in the latest version and releases of the Oracle product, that internally will delivers more automation, new features, and flexibility so that the data can be secure
Technically, Oracle Upgrade means changing the versions or the releases of the Oracle database within the same or in different servers or with different OS platforms (ex: version 9i to 10g, 10g to 11g, and also the release 10.1 to 10.2, 11.1 to 11.2) to the higher version/release that intern will upgrade the existing physical files state to the newer release/version
For upgrading, we will be using startup upgrade command. The startup migrate is deprecated from Oracle 10g for migration (Migration means moving the database from one OS platform to another, or from lower version/release to higher version/release as like upgrade, but the main difference here is we are logically extracting the physical files contents of data and we are loading it back to the higher version/release within the same or across the different OS servers, here the physical files state does not change as like upgrade)
For More understanding on Oracle Version number, Let say the oracle version # 11.2.0.1.0, Then 11 is major database release number, 2 is database maintenance release number, 0 is Application release number, 1 is component specific release number, 0 is platform specific release number.
If we upgrade the database, the first number and second number will change. The Fourth digit indicates the Patch number, This number will change whenever we apply patch to database.
Types of Upgrade:
- Manual Upgrade by running the script manually in Proper order.
- Using Database Upgrade Assistant (DBUA) utility.
Manual Upgrade:
Prerequisite:
We should have the Oracle Database 10g and here we are upgrading to Oracle 11g (11.1.0.6)
Step 1: Installing Oracle 11g Home
We cannot upgrade the existing Oracle Home, since 11g is not a patchset. We have to install 11g oracle home as a separate ORACLE_HOME in parallel to 10g Oracle home
For Eg: If 10g Oracle Home is : /u01/app/oracle/oracle/product/10.2.0 the the 11g oracle home should be /u01/app/oracle/oracle/product/11.1.0
Start the installation using below command
./runInstaller -invPtrLoc /u01/app/oracle/oracle/product/11.1.0/oraInst
The GUI screen will open for Installation and follow the steps. DO NOT give Yes for "Upgrade as existing database" Option. At the end of the installation. installer will ask to run root.sh script. DO NOT press OK button. Run root.sh as a root user and once done, press OK button. This will complete the software installation for Oracle database 11g.
Step 2: Pre-Upgrade Utility
The Pre-Upgrade Information Tool is a SQL script that ships with Oracle Database 11g and must be copied to and run from the environment of the database being upgraded. Complete the following steps to run the Pre-Upgrade Information Tool:
In 11g Home you installed, go to $ORACLE_HOME/rdbms/admin and copy the file utlu111i.sql to some temp location
[oracle]$cd $ORACLE_HOME
[oracle]$cd rdbms/admin
[oracle]$pwd
/u01/app/oracle/oracle/product/11.1.0/db_1/rdbms/admin
[oracle]$cp utlu111i.sql /tmp
The utility will give the output in the form of recommendation to be implemented before starting the upgrade. Unless these requirement are met, the upgrade will fail.
SQL> @/tmp/utlu111i.sql
Oracle Database 11.1 Pre-Upgrade Information Tool 02-11-2011 16:16:52
**********************************************************************
Database:
**********************************************************************
–> name: ORCL
–> version: 10.2.0.1.0
–> compatible: 10.2.0.1.0
–> blocksize: 8192
–> platform: Linux IA (32-bit)
–> timezone file: V2
.
**********************************************************************
Tablespaces: [make adjustments in the current environment]
**********************************************************************
–> SYSTEM tablespace is adequate for the upgrade.
…. minimum required size: 693 MB
…. AUTOEXTEND additional space required: 243 MB
–> UNDOTBS1 tablespace is adequate for the upgrade.
…. minimum required size: 262 MB
…. AUTOEXTEND additional space required: 62 MB
–> SYSAUX tablespace is adequate for the upgrade.
…. minimum required size: 438 MB
…. AUTOEXTEND additional space required: 178 MB
–> DEF_TEMP tablespace is adequate for the upgrade.
…. minimum required size: 61 MB
**********************************************************************
Update Parameters: [Update Oracle Database 11.1 init.ora or spfile]
**********************************************************************
– No update parameter changes are required.
.
**********************************************************************
Renamed Parameters: [Update Oracle Database 11.1 init.ora or spfile]
**********************************************************************
– No renamed parameters found. No changes are required.
.
**********************************************************************
Obsolete/Deprecated Parameters:[Update Oracle Database11.1 init.ora or spfile]
**********************************************************************
–> “background_dump_dest” replaced by “diagnostic_dest”
–> “user_dump_dest” replaced by “diagnostic_dest”
–> “core_dump_dest” replaced by “diagnostic_dest”
.
**********************************************************************
Components: [The following database components will be upgraded or installed]
**********************************************************************
–> Oracle Catalog Views [upgrade] VALID
–> Oracle Packages and Types [upgrade] VALID
–> JServer JAVA Virtual Machine [upgrade] VALID
–> Oracle XDK for Java [upgrade] VALID
–> Oracle Workspace Manager [upgrade] VALID
–> OLAP Analytic Workspace [upgrade] VALID
–> OLAP Catalog [upgrade] VALID
–> EM Repository [upgrade] VALID
–> Oracle Text [upgrade] VALID
–> Oracle XML Database [upgrade] VALID
–> Oracle Java Packages [upgrade] VALID
–> Oracle interMedia [upgrade] VALID
–> Spatial [upgrade] VALID
–> Data Mining [upgrade] VALID
–> Expression Filter [upgrade] VALID
–> Rule Manager [upgrade] VALID
–> Oracle OLAP API [upgrade] VALID
.
**********************************************************************
Miscellaneous Warnings
**********************************************************************
WARNING: –> Database is using an old timezone file version.
…. Patch the 10.2.0.1.0 database to timezone file version 4
…. BEFORE upgrading the database. Re-run utlu111i.sql after
…. patching the database to record the new timezone file version.
WARNING: –> Database contains stale optimizer statistics.
…. Refer to the 11g Upgrade Guide for instructions to update
…. statistics prior to upgrading the database.
…. Component Schemas with stale statistics:
…. SYS
…. OLAPSYS
…. SYSMAN
WARNING: –> Database contains schemas with objects dependent on network
packages.
…. Refer to the 11g Upgrade Guide for instructions to configure Network ACLs.
…. USER SYSMAN has dependent objects.
WARNING: –> EM Database Control Repository exists in the database.
…. Direct downgrade of EM Database Control is not supported. Refer to the
…. 11g Upgrade Guide for instructions to save the EM data prior to upgrade.
.
PL/SQL procedure successfully completed.
This scripts will generates to check whether all the properties will match during upgradings,
Tablespaces: Verifies that the tablespaces are suitable to upgrade, if any problems of space, increase the size of tablespaces
Update parameters: Check the update parameters from 10.2.0.1 to 11.1.0.6
Renamed Parameters: Check the renamed parameters in 11.1.0.6
Obsolete/Deprecated parameters: Remove the parameters which are deprecated in the 11.1.0.6
version. More about the deprecated parameters, refer the Oracle 11g documentation
Components: Verify all the components are VALID, if they show INVALID, run ‘utlrp.sql‘ from
Oracle10g’s ORACLE_HOME to make them VALID.
Miscellaneous Warnings: The timezone file version should be upgraded from 2 to 4.
The remaining miscellaneous warnings can be ignored.
Step 3: Executing the recommended steps
Following are the critical steps to be executed based on the above warnings. These command are to be executed while connecting to database from 10g Oracle home.
a) TimeZone Issue
WARNING: –> Database is using an old timezone file version.
…. Patch the 10.2.0.1.0 database to timezone file version 4
…. BEFORE upgrading the database. Re-run utlu111i.sql after
…. patching the database to record the new timezone file version.
Finding the version of existing timezone files
SQL> select * from v$timezone_file;
For 10.2.0.1, check the metalink note ID 413671.1. The table which defines the patch to be applied to upgrade the timezone.
If there is no official patchset for the version you are currently having then you can Identify patch for a different patchset, but with same release.
For example if you run 10.2.0.1 and there is no particular patch release. In this case we can make use of patch 5632264 for 10.2.0.2 and 10.2.0.3, and this will be applicable to 10.2.0.1 as well.
Please follow the metalink note ID 396387.1
Once you identify the correct patchset (5632264 for 10.2.X), download the same and unzip it.
1. Unzip the patch file p5632264_10203_Linux-x86-64.zip
$ unzip p5632264_10203_Linux-x86-64.zip
2. Change directory to the 5632264 and list, which will contain the timezone files
3. Backup the existing timezone files in the Oracle10g’s ORACLE_HOME, these will be present under
$ORACLE_HOME/oracore/zoneinfo directory
4. Copy the newly extracted files to the ORACLE_HOME path
$ cp -r 5632264/files/oracore/zoneinfo $ORACLE_HOME/oracore/zoneinfo
5. If the new timezone changes has to come to an effect, restart the database and select the timezone
SQL> select * from v$timezone_file;
FILENAME VERSION
———— ———-
timezlrg.dat 4
b) Optimizer Statistics Warning
WARNING: –> Database contains stale optimizer statistics.
…. Refer to the 11g Upgrade Guide for instructions to update
…. statistics prior to upgrading the database.
…. Component Schemas with stale statistics:
…. SYS
…. SYSMAN
Gather the dictionary statistics by executing the PL/SQL blocks
SQL> EXEC DBMS_STATS.GATHER_DICTIONARY_STATS;
PL/SQL procedure successfully completed.
SQL> EXEC DBMS_STATS.GATHER_SCHEMA_STATS(‘SYS’);
PL/SQL procedure successfully completed.
SQL> EXEC DBMS_STATS.GATHER_SCHEMA_STATS(‘OLAPSYS’);
PL/SQL procedure successfully completed.
SQL> EXEC DBMS_STATS.GATHER_SCHEMA_STATS(‘SYSMAN’);
PL/SQL procedure successfully completed.
Step 4: Rerun the Pre-Upgrade Utility
After executing the recommended steps, run the pre-upgrade utility once again to make sure, you don’t get any critical warnings.
Run the pre-upgrade utility script on 10g database while connecting from 10g oracle home. If every thing looks fine, Shut down the database from 10g Oracle Home
This time make sure you don't have the critical warnings like the one with TIMEZONE version.
Step 5: Backup the Oracle 10g Database
Perform the Oracle 10g database backup in any of the methods like cold backup, hot backup or RMAN backups. Backup the ORACLE_HOME software path too.
Cold backup : http://engistan.com/oracle-11g-cold-backup-with-restore/
Hot backup : http://www.oracledistilled.com/oracle-database/backup-and-recovery/user-managed-online-backups-hot-backup/
RMAN Backup : http://psoug.org/reference/rman_demos.html
Step 6: Create Parameter file for Oracle 11g
Backup the Oracle10g’s parameter file and paste under Oracle11g’s default path
$ cp /u01/app/o10g/product/10.2.0/db_1/dbs/initorcl.ora
/u01/app/o11g/product/11.1.0/db_1/dbs/initorcl.ora
Edit the Oracle 11g’s parameter file to remove the Obsolete/Deprecated parameters, as listed in the output of Pre-Upgrade Utility.
Step 7: Upgrade the database
1. If the Oracle10g database is still running, shutdown the database
2. Export the variables for Oracle 11g
$ export ORACLE_SID=orcl
$ export ORACLE_BASE=/u01/app/o11g
$ export ORACLE_HOME=/u01/app/o11g/product/11.1.0/db_1
$ export LD_LIBRARY_PATH=$ORACLE_HOME/lib:$LD_LIBRARY_PATH
$ export PATH=$ORACLE_HOME/bin:$PATH
3. Start the SQL*Plus with sysdba privilege
4. Start the Oracle11g database using the ‘startup upgrade‘
SQL> startup upgrade
5. Verify the version of Oracle
SQL> select * from v$version;
BANNER
———————————————————————-
Oracle Database 11g Enterprise Edition Release 11.1.0.6.0 – Production
PL/SQL Release 11.1.0.6.0 – Production
CORE 11.1.0.6.0 Production
TNS for Linux: Version 11.1.0.6.0 – Production
NLSRTL Version 11.1.0.6.0 – Production
6. Upgrade the data dictionary tables via the catupgrd.sql script.
SQL> @$ORACLE_HOME/rdbms/admin/catupgrd.sql
From hereafter the database downtime will starts and the upgrading a database will take its own time to completes depending upon the size of the database and environment.
Once the upgrades completes, the database will shutdown automatically
Step 8: Post Upgrading Steps
1. Once the upgrade completed, reinitialize the system parameters for normal startup and bounce back the database by login again as sys with sysdba privilege, and start the database to normal mode
SQL> startup
2. Check the dba_registry for the components and its status
SQL> select comp_name, status, version from dba_registry;
3. Run ‘utlu111s.sql‘ script to display the results of the upgrade
SQL> @$ORACLE_HOME/rdbms/admin/utlu111s.sql
4. Run ‘catuppst.sql‘ script from $ORACLE_HOME/rdbms/admin directory, to perform upgrade actions that change the database from UPGRADE mode to the NORMAL mode
SQL> @$ORACLE_HOME/rdbms/admin/catuppst.sql
5. Find for the invalid objects after the upgrade
SQL> select count(*) from dba_objects where status=’INVALID’;
COUNT(*)
———
1572
6. Run ‘$ORACLE_HOME/rdbms/admin/utlrp.sql‘ script to recompile the INVALID objects
SQL> @$ORACLE_HOME/rdbms/admin/utlrp.sql
7. Again find the status for invalid objects after recompiling them
SQL> select count(*) from dba_objects where status=’INVALID’;
COUNT(*)
———-
0
This will completes the manually upgrading the Oracle database from 10.2.0.1 to 11.1.0.6
Using the Database Upgrade Assistant (DBUA):
You can start the Database Upgrade Assistant (DBUA) via the shipped utility in Oracle 11g, the dbua command. The scripts we had executing in the Manually in the previous method will be executed and taken care by the DBUA utility
Follow the steps to upgrade the Oracle 10.2.0.1 database to 11.1.0.6:
1. Login in as Oracle 11g user, and initiate all the variables need for the environment
$ export ORACLE_BASE=/u01/app/o11g
$ export ORACLE_HOME=/u01/app/o11g/product/11.1.0/db_1
$ export LD_LIBRARY_PATH=$ORACLE_HOME/lib:$LD_LIBRARY_PATH
$ export PATH=$ORACLE_HOME/bin:$PATH
2. Confirm the Oracle 10g database name and ORACLE_HOME path is entered in /etc/oratab file
$ cat /etc/oratab
orcl:/u01/app/o10g/product/10.2.0/db_1:N
3. Execute the dbca utility from Oracle 11g’s path
$ $ORACLE_HOME/bin/dbua
4. A Welcome screen will appear, click Next


6. The dbua utility will check the warnings should be taken care during the upgrading

Here again we need to solve the warning like update the timezone file version as a critical warning, and remaining warning you can skip. If you continue with this screen, at the point of in time the dbua will through an error and the upgrading the database will fail. Its a better practice to solve the warnings.
For Timezone issue and Optimizer Statistics warning , please follow Step 3 in Manual Upgrade process
Gather the dictionary statistics by executing DBMS_STATS.GATHER_SCHEMA_STATS for all the users as per the warning. This will solve the main warnings that got from the above step, the remaining warning can be ignored. Rerun the dbua utility again and clear the previous steps, now the warnings will be ease to upgrading the database, you can ignore these warnings
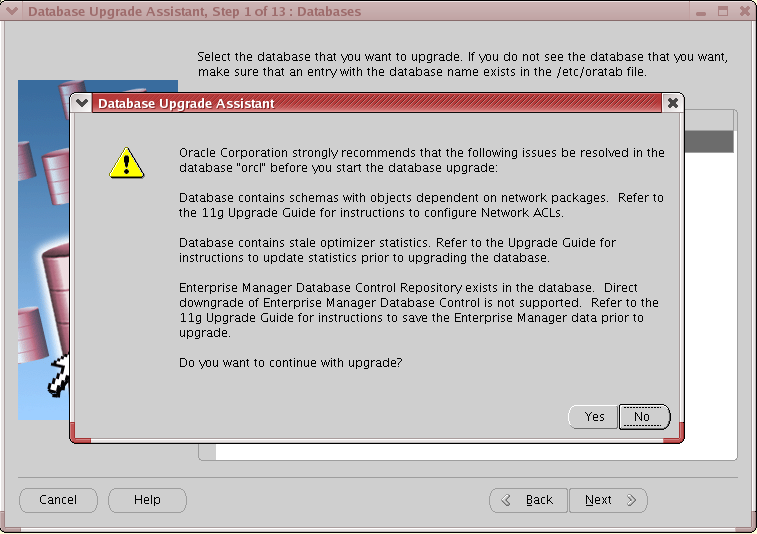
Click ‘Yes’, this will continue with the further steps of upgrading.
7. The next screen will allow to select the ORACLE_BASE and the Diagnostic Destination, Click Next

8. You can then select to have your database files moved during the upgrade process. Click Next

9. DBUA will then prompt you for a flash recovery area destination for the storage of backup and recovery-related files. Click Next

10. DBUA will then prompt you to recompile invalid PL/SQL objects following the upgrade. If you do not recompile these objects after the upgrade, the first user of these objects will be forced to wait while Oracle performs a run-time recompilation. Click Next

11. DBUA will prompt for back up the database as part of the upgrade process. If already backed up the database prior to starting DBUA, elect to skip this step. If you choose to have DBUA back up the database, it will shut down the database and perform an offline backup. DBUA will also create a batch file in that directory to automate the restoration of those files to their earlier locations. Click Next


13. A final summary screen displays your choices for the upgrade, and the upgrade starts when you
accept them. Click Finish

14. The DBUA will start upgrading the database, the upgrading logs can be read in the ORACLE_BASE path

15. The DBUA will complete the upgrading the database, Click ‘OK’

16. After the upgrade has completed, DBUA will display the Upgrade Results screen, showing the steps performed, the related log files, and the status.


If you are not satisfied with the upgrade results, you can choose the Restore option. If you used DBUA to perform the backup, the restoration will be performed automatically; otherwise, you will need to perform the restoration manually.
When you exit DBUA after successfully upgrading the database, DBUA removes the old database’s
entry in the network listener configuration file, inserts an entry for the upgraded database, and reloads the file.
Following the upgrade, you should double-check the configuration and parameter files related to the
database, particularly if the instance name changed in the migration process. These files include
The tnsnames.ora file
The listener.ora file
No comments:
Post a Comment